


What Are Webhooks
Webhook are essentially a way for an app to hook or be hooked to another app by doing so it can provide or receive information from the other application in real time since the communication is direct. It’s almost as if the two applications are speaking to each other, Webhooks and Zoho Cliq, help you notify or get notified when something specifically new happens. This something can be anything, it can be a comment on a forum post or a task being finished in the task management application. It can only be configured according to your use case. and you also don’t have to worry about your privacy and security issues using Webhooks since they support different authentications such as oAuth and API keys.
Need help configuring push notifications to send a specified URL whenever an event-related activity occurs?
Schedule a free consultation with our dedicated Zoho Specialist!

Why Should You Go with Webhooks
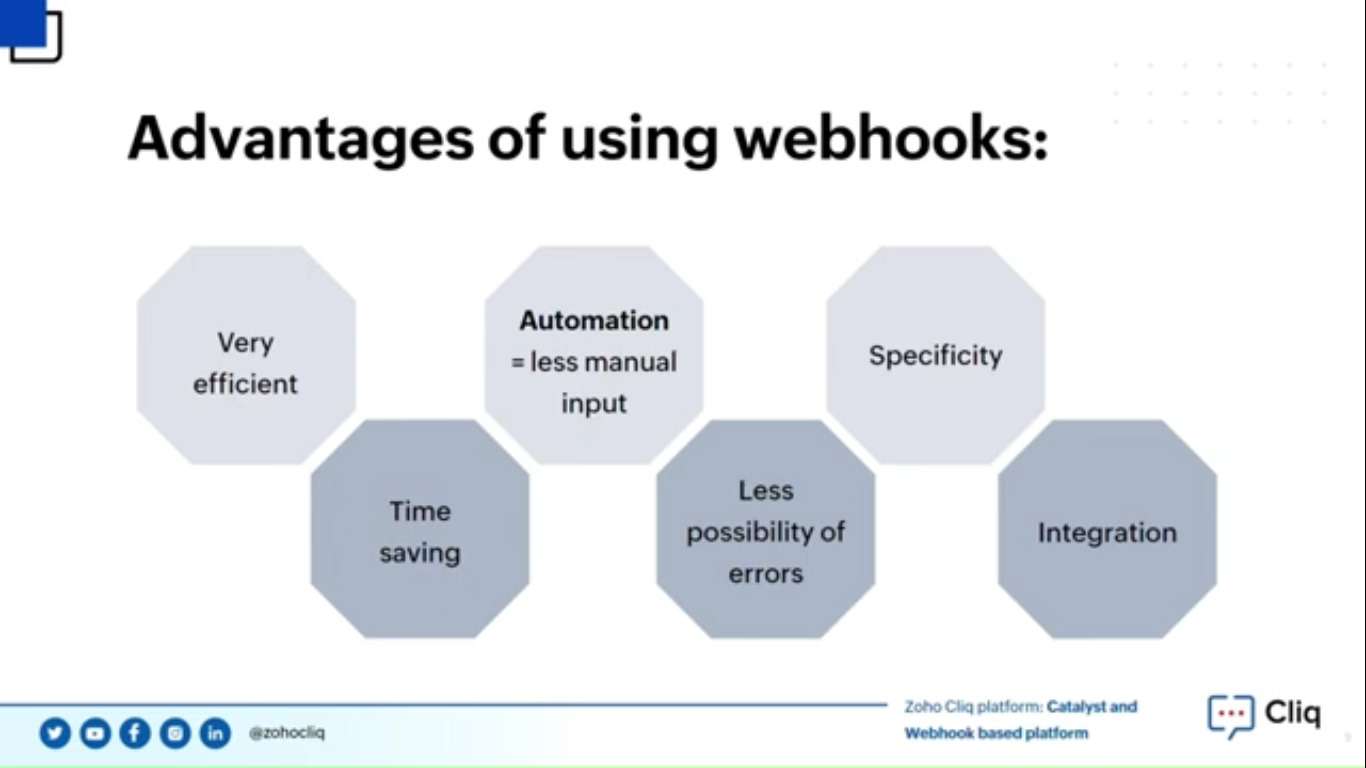
There are a lot of advantages to using Webhooks to create your extension. First, they are very efficient, unlike other APIs, which Poll for data which means they have to check constantly for triggering events. Webhook allow the application to push the data from the triggering events into the hooked application as soon as it appears. This is like getting an alert when something changes in an application rather than you having to check it yourself periodically This reduces wait times and allows for the real-time data transfers. These instant transfers increase your work efficiency and also saves a ton of time. Also, when you use Webhooks, you can easily automate certain processes that transfer data and allows users to determine specific actions for triggering events.
The setting up is fairly easy and requires to be done, only at the beginning. After that, the Webhook will be up and running automatically which will reduce manual input. This reduction in manual input will reduce the risk of any error in the flow.
Specificity is another benefit of using Webhooks in your Zoho developer, as they, let you connect specific parts of an application. Instead of having to connect multiple elements to create a working data transfer system. This also helps with data privacy issues because if the flow is compromised only data within the parts of the application that are connected or threatened. it also helps keep your cool code clean and understandable.
Example of Webhook Based Extension
Let’s take a look at an example for a Webhook base extension, and how to create it. The extension for this example is going to be the time tracker. This extension will help track the time that you take for tasks, so you can manage your schedule in a better way.
First, go to cliq.zoho.com/developer, here you can see that there is a creator extension button, click on that button to create your extension. Now enter your name and the description that you need for your extension, since we’re going to go with the time tracker extension, it’s going to be named as time tracker, enter the description.
Next up, the execution type is going to be a Webhook base extension so choose Webhook. Past your callback URL copy in the URL space provided. Next is to add all the components that’s needed. first add the bot. The bot name is going to be time tracker and enter the description for the bot in the space provided.
Next, is to add the welcome handler and the message handler both of these handlers have only the user attributes. select both the user attribute for both of these. also add a few bot menu actions. The first bot menu action is going to be add task. This is going to help add the task to the time tracker. This is going to help the user attribute and then add another bot task. the next bot task is going to be current tasks. This is also going to have the user attributes. So just check the user attribute. The next task is going to be projects, and this is also going to have the user attribute, check the user attribute box. And click on, add to bot. next, I’m going to add another component, this time it’s going to be a message action. This is also going to be an ad task message action, because in spite of having only the bot menu action. We are also going to have another message action to add a task to the time tracker. This message type is only going to be for text, so uncheck both the attachments and links
For the execution handle choose message and user attributes and click on add to add the message action. Next step is to add a function. This function is going to be the time tracker from function. name the time tracker form function and enter the description. The function type is going to be form and it’s going to have the user attribute.
Next is to add another function, this time it’s going to be the button function, enter the description for the bottom function.
Then deactivate both the installation validator and the insulation handler. Click on create extension, and that’s it, you’ve created your extension for your time tracker.
Under the bot we can see that there are three sub action, projects, current task and add tasks. Click on the add tasks sub action. And you’ll notice that there are no authorized applications yet. Since this is the first time, we need to authorize the application to use. Allow access to our profile once we’ve authorized it click on add task again. Then you’ll notice that it asks for a title.
fill the marketing sheets. There is always a default project called general. Click on general. there is an option called start now, if you click on this option, the timer will start immediately. but if you unselect the option ‘start now’ a new option comes called start time. his will set up timer so that at a specific time, it will start. to view the task that we are currently working on Let’s click on current task.
After authorization, click on add task again, you’ll notice that we need to enter a title for task. fill in the marketing sheets.
Cliq on current task, it’s essentially going to tell you that you’re actually working on the task of filling in the marketing sheets It’s in the project general.