


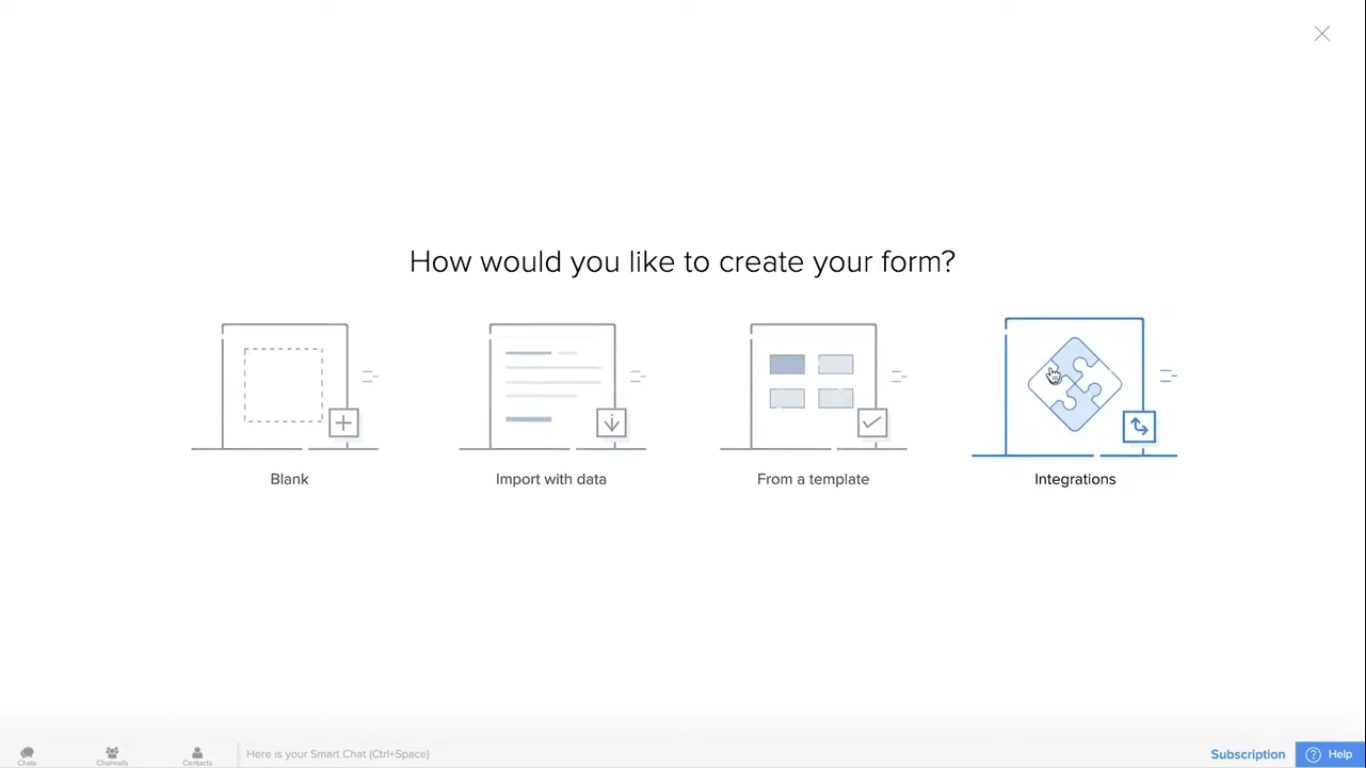
The first thing we’re going to do is create a new form that will be considered a table and application. There are four different ways a form can be created from scratch using the blank method importing from a spreadsheet; the next option is using template templates, which are similar to our app deck in the sense that they’re pre-made and have workflows bundled in with them. For example, we could easily use our time tracking sheet option that already does the exact requirements for this demo for demo purposes; we will be rebuilding this one from scratch. Integration forms are a way to create a unique interface that users can use to input data into a third-party service automatically. For our example, we’ll create a table for employees with data that already exists in a spreadsheet. I’ll select the import with data option and pick our file; you’ll see all the data in the spreadsheet and field types that are automatically mapped based on data that we detected in those cells. For example, employee ID became a number field and automatically identified as an email field. The rest were identified as normal text fields; now that I see that all the data is organized properly, I can go ahead and click create now that the form has been created, and I can access this application.
Need help digitizing your business operations without the hassle of traditional development with Zoho Creator?
Schedule a free consultation with our certified Zoho Creator developers!
Employee Report
I’m taken to a report called all employees; this report contains data imported from the XLs file simultaneously, and a form called employees is automatically created. This form includes the fields based on the data imported. We can go back to the builder and click edit this application to be able to make further changes. We’re going to create one more form that can hold our timesheet information will click the plus button to create a new component, and we’ll select the form again; we’ll make a blank one.
We’ll call this our timesheet; many different field types are on the left-hand side. From plain text to ones to smart fields, like phone numbers and addresses, and media fields, such as file uploads, videos, and audio and signature. In our case, we need a couple of simple fields, such as check-in and check-out times.
I’ll pick up a field and drag it over here, I can call this my check-in time, and on the right-hand side, you can see there are many different properties, and for every different field type, there are different properties that may pertain to it. Here I’ll add one more date time field, and I’ll call this my check-out time. Last, I’m going to create what’s called a lookup field, and a lookup field is going to be what connects two different tables or two different forms in an application.
Here, this is going to create a relationship between this timesheet and a specific employee. In this little display, I can configure multiple fields to be shown, so I will make it first and last names. I’m going to show you a couple of different field types we don’t need for this application, but to show you what I meant by different field properties.
Number Fields
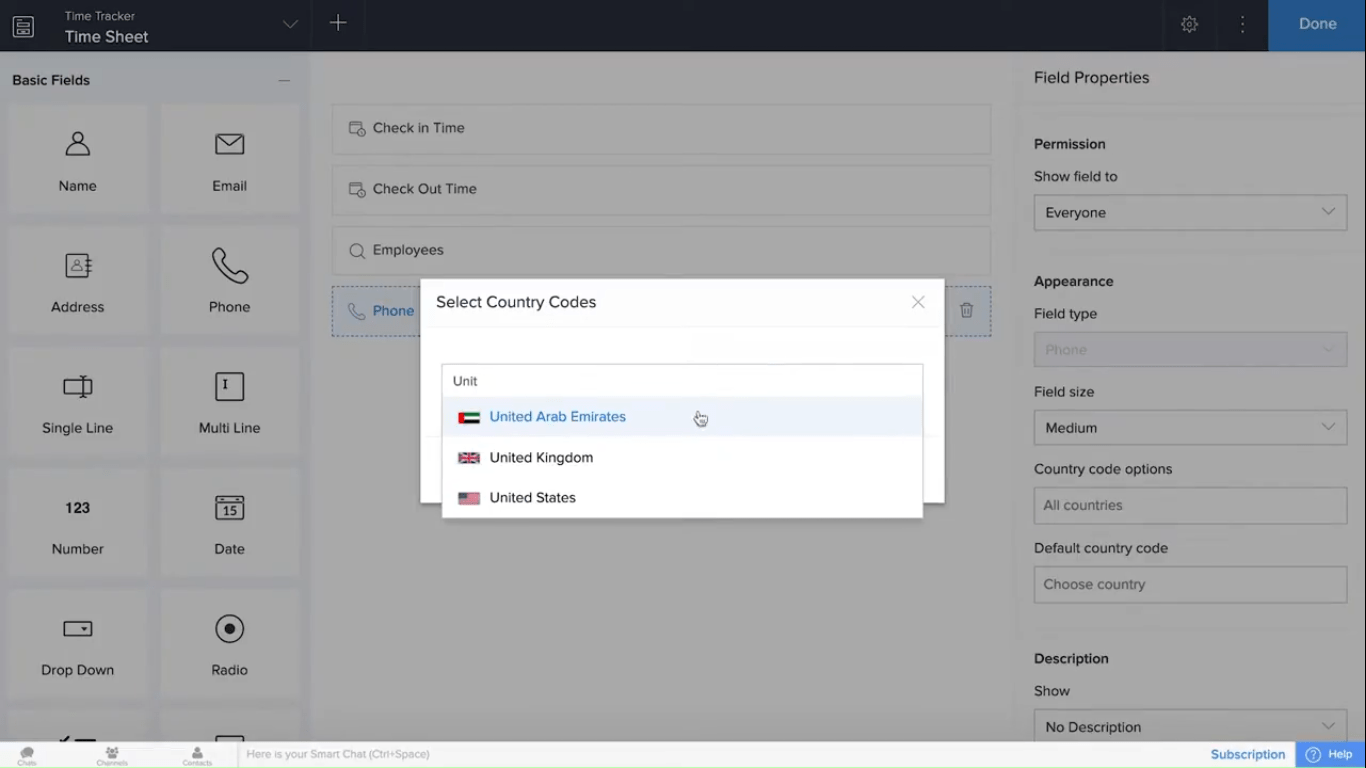
For something like a phone number field, you can see on the right-hand side that a normal phone number field contains personal information. Naturally, compliance and security are super important with applications built on a low-code platform. We can enable or disable certain fields from being tagged as personally identifiable information or PII fields. Once these fields are tagged, when that record is deleted, it’s fully purged from the system, and there’s no recovery.
This complies with different, right-to-be-forgotten legislation that’s out there in different countries and areas. But back to this phone field, we can have different pieces of information like the country codes we want to display. If I only want the united states, I can select that and configure it and make a default one. Our jack-of-all-trades field is generally are single-line field. This field can be used in any case where a prebuilt, more specific field may or may not be able to meet your needs by default. Again, that privacy option is available, but we also have an encrypt option on a certain field that lets the data be encrypted at rest. It cannot be read otherwise, and then for a single line field, we also have options that are used on mobiles, such as a QR code scanner or a barcode scanner. If I enable this again, more options come up when the form first loads; we can request input. We can automatically submit after capturing the picture instead of clicking the submit button on mobile, but you can see the different available properties.
How Many Hours Worked
The last field I need to create on this form is to show how many hours were worked. I can use a formula field to accomplish this I take the check-out time and subtract the check-in time from it. However, this will give me a value in MS to turn milliseconds in two hours. I need to divide by 1000 to get the milliseconds in two seconds, then by 60 to turn the second into a minute, and then by sixty-one more times to turn the minute into two hours and I can click done; I’ll rename these two hours’ work. And I’ll make sure this field is visible in the form and click done now, let’s see what this page looks like. I can put my check-in time, and let’s say I checked in at about 8:00 this morning and I’m checking out at maybe 4:00 p.m. This afternoon and the employee is going to be bob.
You can see here that the number of hours worked is exactly. If I change this for two, maybe a 4:30, it’s going to recalculate to eight and a half. And if I change it from 4:30 and maybe 30 seconds, if you want to get that granular, it’ll give it to me all the way. You can figure out a different rounding method to truncate that number; however, I want to. Last, I can click submit, that data is stored, and now we’ve built a timesheet application super quickly.
Let’s return to the application builder and create a workflow. Select the workflow button at the top and click create. Workflows and automation are naturally big factors in low code platforms few different types of workflows can be triggered on different actions in the system. The first is while using a form to see a couple of triggers that happen whenever a record is created for the first time. A record is modified when a record is deleted. The next option is on a schedule, which could be a regular daily, weekly, monthly, or whatever, or also based on a date time field inside the application. For example, if we want to send an email 5 minutes after an employee checks out, we can do so by selecting the time sheet form and the check-out time. We’re going to do it after 5 minutes after they check out. And this will only happen once we don’t want it to be recurring, and we could send an email that way.
Next, we have an approval process which is what we will be configuring. And the last one is going to be a payment process. If you connect a different payment provider, you’ll have an entire payment flow with all sorts of tracking that happens directly inside the system. We’ll build this approval process, and we’re going to select our timesheet, and we’re going to call this overtime approval and will only do it on a condition for which the number of hours worked is greater than eight. If it’s less than eight hours that you worked that day, we don’t need approval for it, so let’s click create a workflow, and we’ll get to the next step. An approver has the authority to either approve or deny a record once it’s been submitted. We can add a new approver and select a user or pick from a group of users called roles.
But we’ll pick an individual user here; we’ll call it the gardener boss, and we can make the labels. Say whatever you want them to say; approve, and it will suffice, and click save. You can see many different actions that can happen based on this approval process, and we can have levels of approvals.
Level 1 To Level 2
Level 1, and then we can add a level 2 down here as well, a different approver, but in this case, we’ll keep it simple and flat. When a record is approved first, we will send an email to the person who submitted it, which will happen automatically. We can configure this to look and feel how we want to send it to a different address at our CCS and BCCS. We can customize the look and feel of this Zoho mail its full HTML is completely customizable, and tweak it that way. We can also add additional action.