


Today we are going to show you how we can install and use Zoho sign. The first thing you have to do is go to setup marketplace wherever you want to get there. You will find an overextension and just type sign and you will see zoho sign. Click on install now. I usually install it for all users but you can decide whether you want to choose it for a pin only or everyone in the organization. It is going to show us what modules will basically have access to those and as you can see it is created three modules all signed document events the recipient and the documents and it’s also available for all these modules. This will basically be available for contacts, accounts, invoices so you pretty much have this available for every module. These steps will be explained in more detail in the next section.
Article text
Zoho sign enables users to send documents to recipients to get their digital signature. Digital signatures are now considered to be an important aspect because they make users and businesses look more professional and trustworthy. The sign extension also enables users to send documents needed for signing to any contact which is stored in the CRM.
Installing Zoho Sign
There are two different ways you can install Zoho sign extension. The first option is from the Zoho marketplace and the second one is from Zoho CRM account. The steps for the second option are:-
- Click on Settings> Setup > Marketplace > All. You will find that all the installed extensions are listed.
By clicking on All Extensions, you will be able to find all the different extensions that are supported by your CRM. - Click on All Extensions, look for Zoho Sign, and then click on it. All the different details about the extension will be listed.
- Click on Install Now
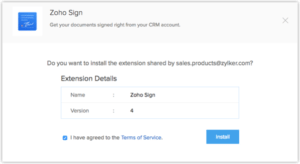
4. A terms of service will appear to you. You will have to agree to the terms of service and then click on Install.
5. Select on one of the following and then click on Confirm.
- Install for admins– This option will be installed in CRM for users who have an administrator profile.
- Install for all users– The extension will be installed in CRM for all users.
- Select profiles– The extension is going to be installed in CRM for users who are manually selected. Select this choice, click on Continue, and then choose the profiles.
The extension is going to be installed automatically for users you specify.
You are now ready.
Requirements for using Zoho extension:
The first thing you have to do is create an organization account and then add the required users to it. Don’t forget this step because you won’t be able to proceed with it.
Getting documents signed using Zoho Sign
Upon being installed, all the details page for deals, leads, contacts, accounts, and agreements are going to have a button called Send for Zoho Sign. This button is going to be used to send the documents that have to be signed by your leads or contacts. To send the documents so they can be digitally signed, you need to:-
- Click on Leads, Accounts, Contacts, or Deals
- Click on the record that you want to send information to.
- In the details page of the record, click on Send for Zoho Sign.

- You will be able to send documents from inventory modules, which consist of, the Quotes, Invoices, Sales Orders, and Purchase Orders
- You will then get different types of choices that are going to be available in the new tab:
- Click on the Add Document button and then select if you would like to upload the file from the desktop or from the module of your Documents module in the CRM.
- Under the Recipients choice, choose the module that your receiver belongs to. The next thing you have to do is click on Next. A magnifying glass symbol will appear to you so you can select the recipient.
- If you want to add another recipient, you have to do click on Add Recipient and choose another contact in the same exact way the first one was done.
You will also be able to add a recipient who you want to look at only but not sign. This can be done by choosing the Add Recipient button.
- Zoho Sign also offers a choice where you want the recipients to successfully sign in. Press on the set signing order button and give a number to ever recipient to select which what they have to sign. The document is then going to the next recipient to be signed. However, this can only happen after the recipient before them have signed.
- You will able leave the recipients a message if there is any extra data you would like to convey.
- Another thing you can do is click on your documents’ description for your personal reference.
Press the More Settings button so you can set:
- Automatic reminders.
- A deadline that the recipient should sign by.
- Time until agreement is going to be held valid.
- Press on
- Press of Next and you are going to redirect to the Zoho Sign
- Make the needed changes, and then press Continue.
- Drag-and-drop the parts you need in the document and press Send. You will find that it is located the page’s top-right corner.
Press on Confirm and then you’re ready to go. You are going to get a receipt confirming that it was sent.
Note: When you install the sign extension, 3 other modules are going to be created which are:-
Zoho Sign Documents: Consists of a documents list that has been sent.
Zoho Sign Recipients: demonstrates the recipients’ list to whom the documents were sent.
Zoho Sign Document Events: Displays a documents list and the status they are currently in.
Every record is going to have an associated list where the details of the agreement will be demonstrated.
Demonstrate and Customize the Sales Signals Notifications
The Sales Signals feature informs you of significant events associated to the Zoho sign. It also notifies you when a document has been signed or rejected by the user. This is a great feature as it will save you the time of having to check every now and then.
To view the sales signals notifications, press on the bell icon in the dashboard’s upper right corner. To customize the notifications:-
.
- Press the Bell icon in your dashboard upper right-hand corner.
- Press on Settings at the Sales Signals’ window.
- Select the notifications you would like to get.
- Click on
How to uninstall the Zoho Sign
If you want to uninstall Zoho sign extension, you need to understand that all associated data is going to be deleted when Zoho sign is uninstalled and you won’t be able to recover it again.
If you want to uninstall the extension:
- Go to Setup> Marketplace > All. You will find all the installed extensions mentioned. Under All Extensions, you are going to be able to view all the different extensions which are supported in your CRM.
- Look for Zoho Sign and then choose the corresponding Uninstall
- Press Ok to confirm and then the extension will be uninstalled right away.