


Zoho subscription is built for subscription-based businesses to help manage customer subscriptions, and billing examples include Zoho, Netflix, and dollar shave club. Using Zoho subscription, you can charge and invoice your customers regularly, manage customer subscriptions, and streamline the other associated back-office tasks. You can connect Zoho subscription to your website or web service in two ways. One, Zoho subscription provides hosted page which can be added to your website directly. Let me give you an example; imagine you have a cart where your customers select the products or select a specific plan of yours once he selects next to the next page. Where you procure your customer’s card details and other information will be provided by Zoho subscription. We call those pages hosted pages; we will be providing those pages for you. All you have to do is embed them in your website, and all the details will be automatically captured in your Zoho subscription organization. You can always use our restful APIs if you have any complex needs. Let’s imagine; in some cases, you are managing your subscriptions manually by typing in the customer name and the corresponding subscription, subscribing to them, and managing still Zoho subscription will help you manage them. We have hosted pages to easily configure your plans and add-ons on your website. You can check out your customers easily for complex needs. We also have APIs and an admin console where you can manually create subscriptions and still manage your subscriptions business.
Need help growing businesses stay on top of their billing and customer subscription handling with Zoho Subscription?
Schedule a free consultation with our Zoho specialists!!
A Quick Overview of Zoho Subscriptions
Once you log into your Zoho subscription account, you will be greeted with a dashboard that gives you a quick insight into activations, signups, active customers, net cancellations, monthly recurring revenue, and lifetime value. All these are very important reports, and you have a quick insight into these reports. You can click on any of these metrics that will directly take you to the report section. We have 25 plus reports, from subscriptions to signups, activations, and active customers. You can go to every section and select a particular product and the date range in which you would like to correlate the data, and you can also export the data in CSV format.
Let me talk about reports in detail at the end of the webinar. Now, let’s go directly to the product section; based on the type of product you offer, you can set different pricing plans with different rates under this product section. Let’s start by adding a product, clicking the add product button, entering the product name, followed by the description notification email address, and then the redirect URL. Let me give you an example. You might be wondering what the redirect URL is. So once your customers subscribe to the product on your website, the next page you want the customer to be redirected to is the redirect URL, so use your web page and say a thank you note.
Once you create a product, you can add different plans – different add-ons and coupons. Click on this plus the new icon to add a new plan, or click on, add plan on the top to add a new plan. Enter the plan name and code, which is a unique code, enter the price and choose the bill, select how you will build, and select the billing cycles. Whether it auto-renews until canceled or if you wish to specify the expiry the number of the business cycle after which you want this plan to be expired, you can type in the number of cycles. If you offer a free trial, imagine if you’re running a software business, you will provide a 14-day trial at the beginning where your customers can try out the product. They will not be billed then; if you wish to enter the free trial, you can enter the number of days. If you have any one-time setup fee, you can type in choose the sales account and tax account, and you can also click on these plus new attacks to create a new tax. You might wonder why the subscription application tracks my accounts and taxes. I will tell you how Zoho subscription is connected to your Zoho box accounting application. I will also tell you how easy it is to manage your subscription business and account for your business using Zoho applications right away. And inside Zoho subscription settings, we have an option where if you wish to track inventory for the plants, you can enable them in the settings once that is done. If you wish to track inventory, check the box here, choose the inventory account and enter the opening stock, followed by the opening stock rate, and finally, the plan description, and hit save to add the plan.
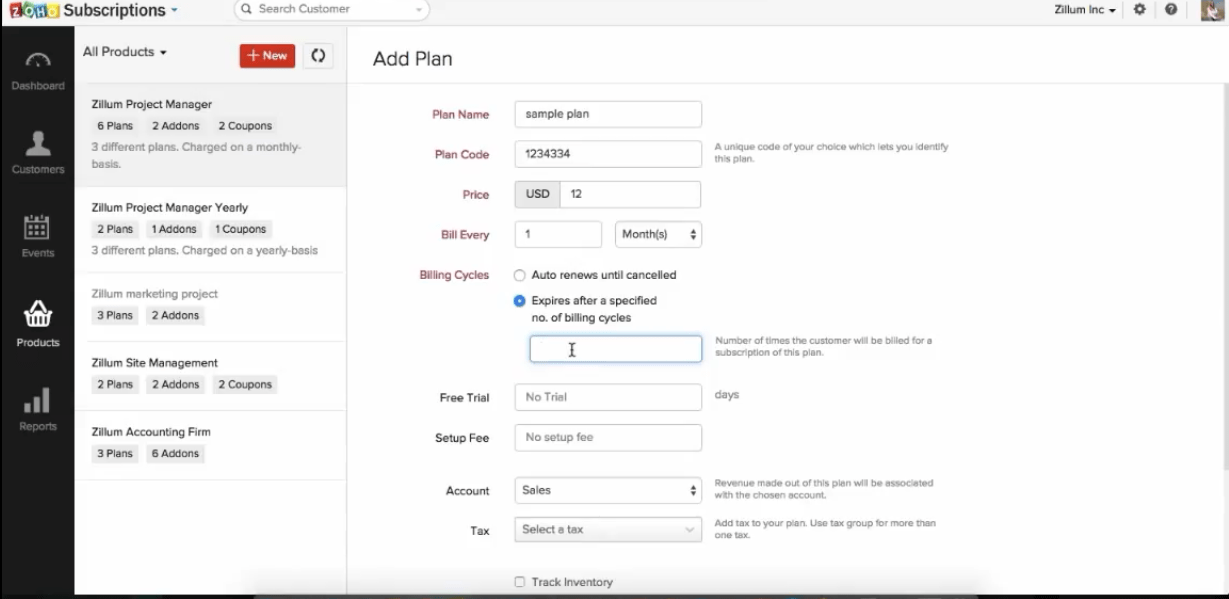
Add Plans
Similarly, you can add as many plans as you want here; you can see I have a bunch of different plans which have been created before, and now let’s go ahead and add an add-on. Similar to a plan, we can enter the add-on name and then the add-on code, a unique code, and enter the unit name and add-on type, whether it’s a one-time add-on or a recurring one. If it is recurring, one chooses the weekly, monthly, or yearly pricing based on your requirement. Choose the pricing scheme unit volume, tier, or package. Based on that, you can enter the details for volume. You can enter the start, 180, and end quantities. For example, let’s assume I’m selling t-shirts. I’m going to say from 1 to 100 t-shirts, I will sell them for $12 and from 101 to 200. I’m going to sell it for $10.
Similarly, you can create different price brackets based on your requirements. And you can say this add-on is associated with all the plans I have created corresponding to this product, or you can uncheck it and specify that this is widely applicable to the premium plan or the enterprise plan. Again, to capture your accounting information, you can select the income account and taxes based on your requirement.
Similarly, you can track Zoho inventory add a description, and save it to create add-ons.
You can create as many plants as you want for a particular product and then add as many add-ons as you want, and now you might be giving discounts, let’s say, a seasonal discount. We have Christmas we give discounts to our customers; click on add coupon to add a new coupon, enter the coupon name, and enter the coupon code; please note the code is always unique. Enter the discount in percentage or can also say flat fee. Redemption type, whether it’s going to be one time or forever, and what are the plans you want the coupon to be associated with? If you want to select the plan, you can choose them from the drop-down.
Similarly, the add-ons to what are all the add-ons you want to associate these coupons to can select them here. Valid up to date, so I can say this coupon is valid till the 30th of this month maximum redemption is nothing but the number of Zoho subscriptions that can be redeemed with this coupon, and once you enter all this information, you can click on save. Now, I’ve shown you how easy it is to manage and create products, plans, add-ons, and coupons.
Hosted Pages
Let me give you a sample of what it looks like; here, I have a plan premium, and here, you can see a plant URL I can click on. This is a sample one that can be embedded in your website; please note that this is a sample one, and you can customize the look and feel of this hosted page based on your website.