1. Install & activate Integration of WooCommerce with ZOHO CRM.
2. Click the Home button.
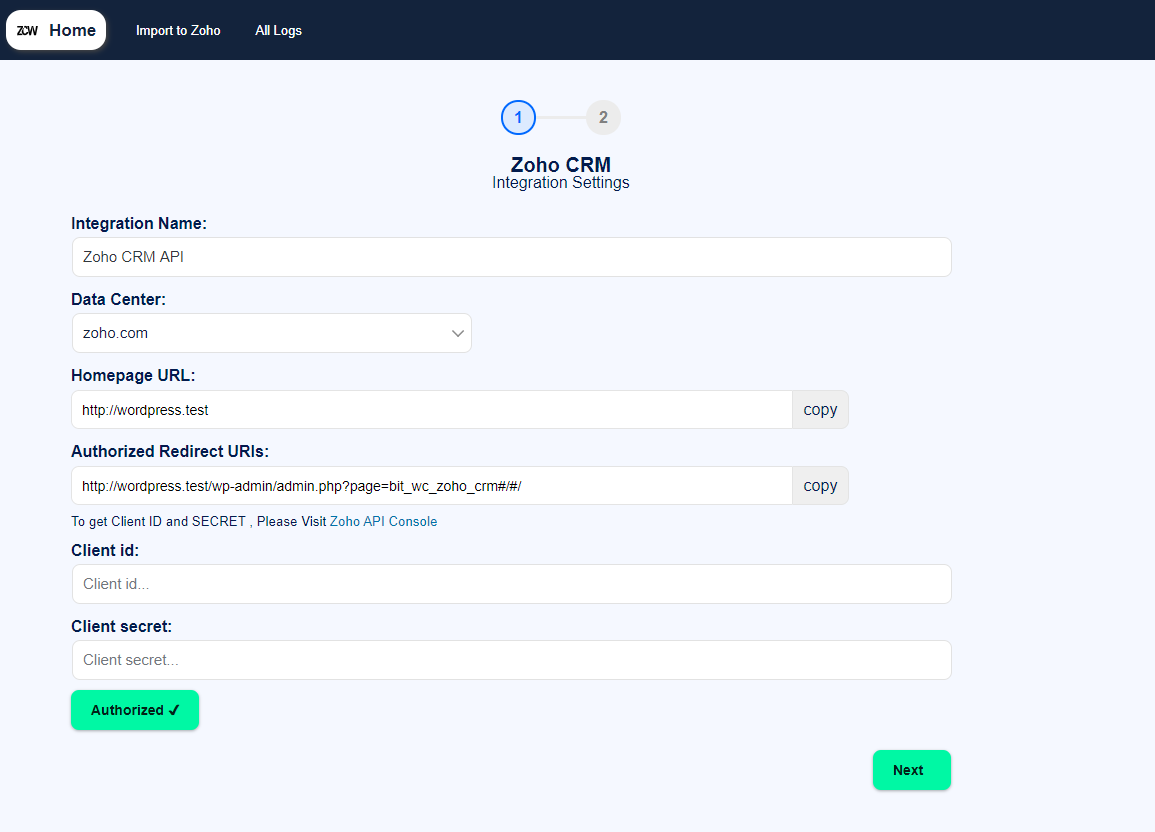
3. From Zoho CRM settings enter Integration Name, Data Center, Homepage URL, and Authorized Redirect URL.
4. To get client Id & secret information go to ZOHO API CONSOLE => Add Client=> Server-based application => Create New Client. Register all the information and get your client ID and secret information.
5. Authorize your site.
Mapping Setting:
For mapping, the fields, first enter your ‘organization name‘ to which your Zoho account belongs. Now you can sync order details of your site with Zoho inventory by mapping the fields regarding your choice. You just have to map those fields only once, after that it will be executed by the plugin automatically.
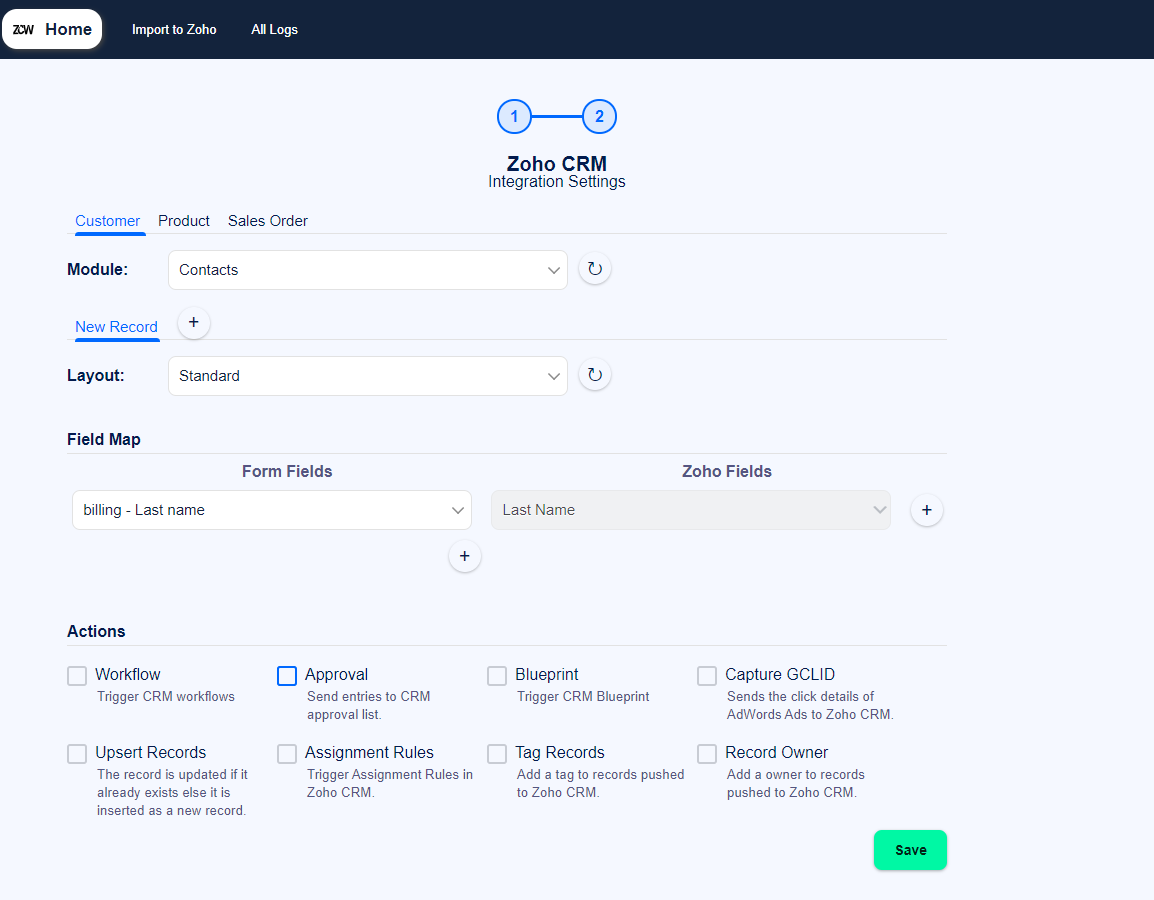
Customer Mapping:
1. Module : After integration with CRM users have to select modules in which all the customer data will be stored. Users can select Accounts, Contacts, Leads, and Custom modules.
2. New Record : From this option, the user can create multiple related lists regarding the customer’s details.
3. Field Map : Users have to sync their wooCommerce checkout field with their CRM field. Suppose you want to set your customer’s first name as a contact name in Zoho inventory. Then select ‘First Name‘ in your wooCommerce checkout field & select ‘Contact_Name‘ in the Zoho inventory field. You can map multiple fields with inventory fields to organize your customer information. You can set ‘Custom value‘ from where you can send order notes according to the placed order.
[1. By default, Zoho inventory has settings not to allow the same name for contacts. But to work with this plugin more precisely, you have to turn on that setting from the Zoho inventory. ]
[2. If you don't want your customers to get duplicated in Zoho inventory, you must map the customer email field. So every time an order has been processed, at first, the plugin will check if the customer with that email already exists in Zoho inventory; if it exists, then it gets referenced to that customer; otherwise, the customer will be considered as a new one. ]
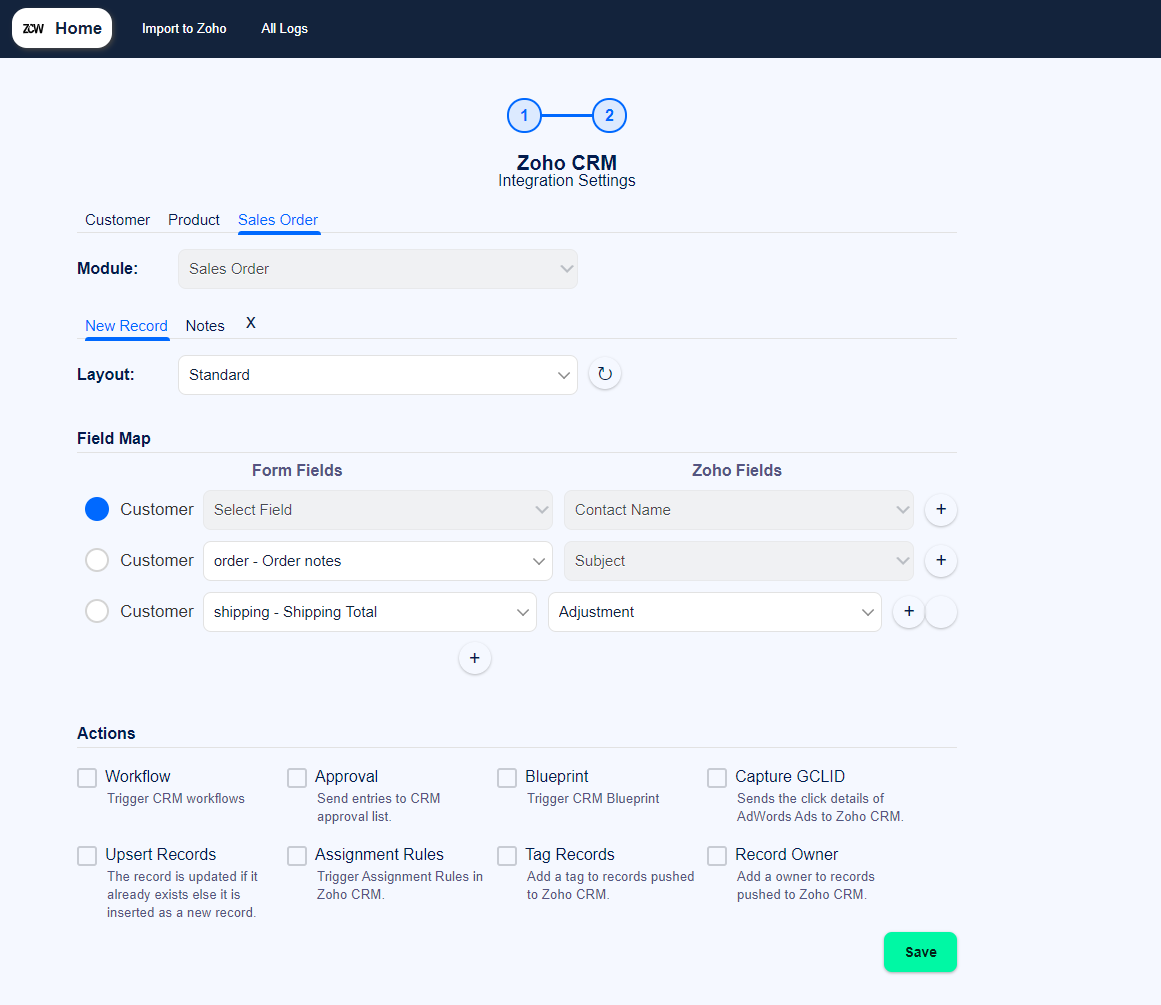
Sales Order Mapping:
Sales order mapping is available for only pro version. When you are mapping your sales order one thing you have to keep in mind that you have to set a look up field on your CRM account. Through your selected look up field you could able to fetch the order records you need. While using the pro version, at first you have to select your desired lookup field. Then based on look up field you can set Customer Module. As like the Customer option you have to set the module of sales order and also can create a related list on New Record field. After mapping all your desired wooCommerce field with CRM field, when customer place any order from your wooCommerce site a corresponding sales order will be created automatically. You can customize your sales order area according to your need that how you want to show your customer’s sales order on your Zoho CRM account.
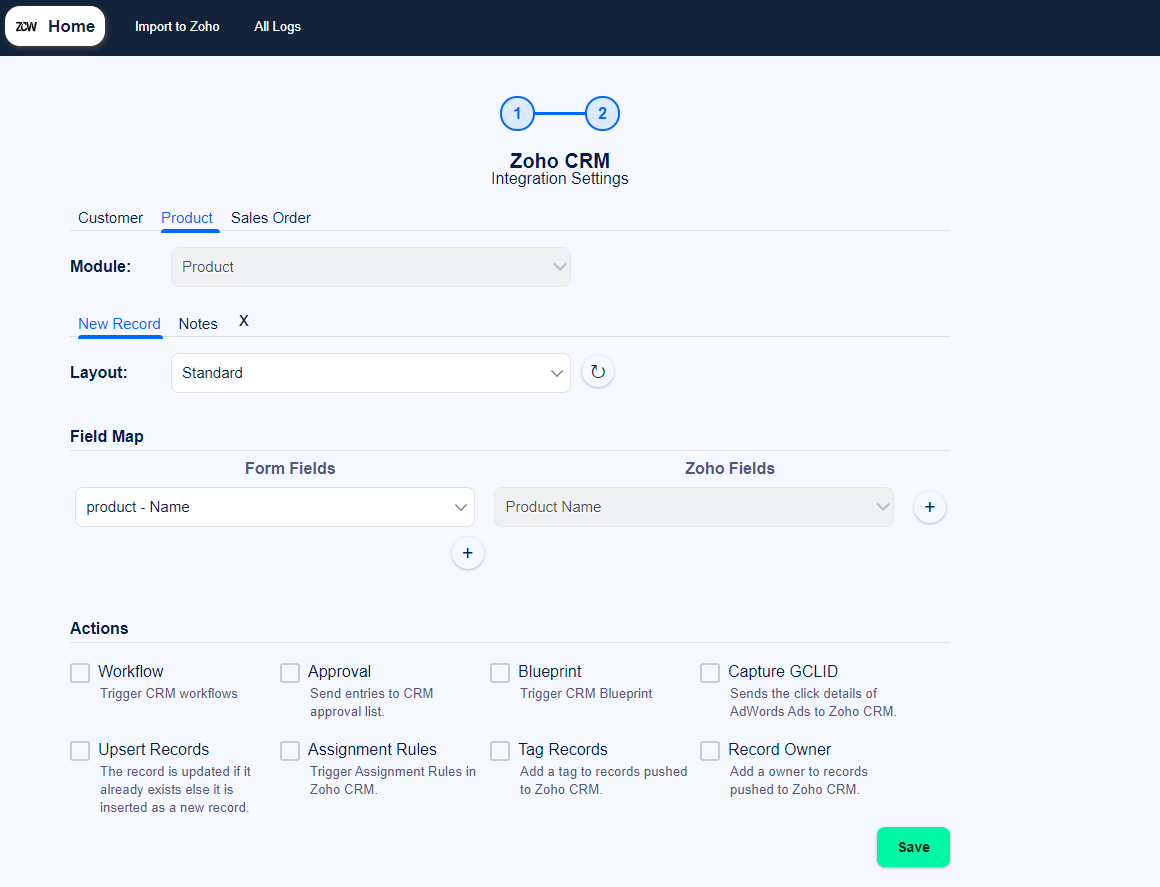
Product Mapping:
From product settings user have to set the product on the module section where all the product details of respective customer will be store from user’s wooCommerce site. If any item of your wooCommerce site is not enlisted in CRM account then you have to entry that particular item or product. Then you can create a related list as like as Customer and Sales Order option. You have to map which field of your wooCommerce site will sync with CRM field. One point to be noted, there will not arise any problem of duplicate data. Once the product is enlisted when multiple customers will order that particular item, all the details of the customers will be sorted regarding that product.
Actions:
Contact Form 7 integration with Zoho CRM has 8 addition action which helps user to control the data submission as well as to track their leads/Contacts more preciously.on CRM account. The actions available are:
1. Workflow : Select this option to trigger the Zoho CRM workflow to relevant the selected module. If you didn’t select this option Zoho CRM workflow to relevant the selected module doesn’t work. 2. Approval list : To Select this option you can send file upload field data to Zoho CRM related list Attachments. You can also send file upload field data to Zoho CRM via normal field mapping. Please select the CRM file upload field from the drop-down which you want to send data. 3. BluePrint : Select this option to trigger the Zoho CRM blueprint to relevant the selected module. If you didn’t select this option Zoho CRM blueprint to relevant the selected module doesn’t work. 4. GCLID : Sends the click id of Google ads to Zoho CRM. 5. Upsert Record : Upon selecting the option YES, if a record with the identical value exists in Zoho CRM, it will be updated with the new values. If you select NO, a new record will be created in Zoho CRM. You can arrange fields in the order in which upsert should happen.
Here’s how upsert works:
For example, you arrange the Email field before the Company field. When a form is submitted with the Company as Bitcode and Email as bitcode@gmail.com.
a. First, it’s checked if the email bitcode@gmail.com exists in the CRM. If it does, then the mapped fields get updated to the record associated with that email address. b. In case of the email address bitcode@gmail.com doesn’t exist in your CRM, it’s checked if Bitcode exists under Company. If it does, then the mapped fields get updated to the record associated with that company name. c. If none of the field values exists, then a new record with all the mapped details is created under the mapped CRM module
6. Assignment Rules : When you choose this option, Assignment Rules defined in Zoho CRM can be triggered when form entries are added to a CRM module. Please select the assignment rule from the drop-down which you want to trigger. 7. Tag records : When you choose this option, you can add a tag to the records that are pushed to Zoho CRM. It helps you to search for records in CRM by tag. There has a list of tag records in the dropdown. You can use Zoho CRM by default tag, form fields also can add a custom tag. 8. Record owner : Select this option you can set a record owner of the sent record.
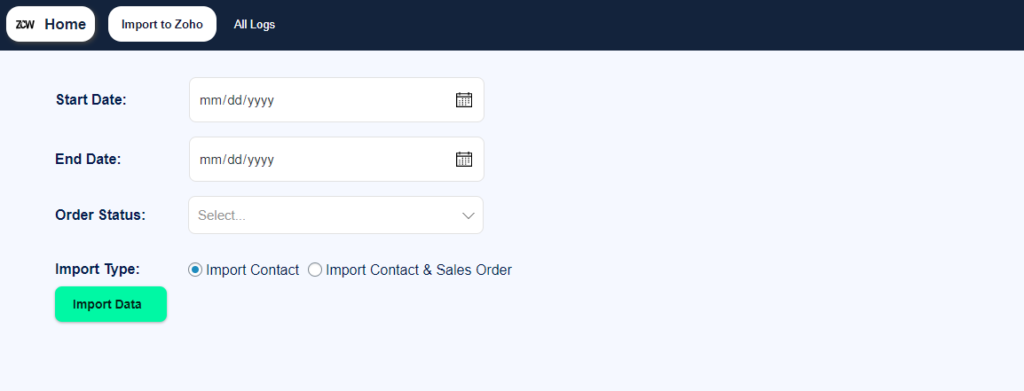
Import to Zoho Setting
In this area you can set a duration, within which date you can import all data to CRM. As example, you are running a wooCoomerce site since 2019 but you have been using this plugin from 2020. Then if you set Start Date – 1/01/19 , End Date – 1/01/2020, Order Status – Confirmed & also set Import Type, after clicking ‘Import Data’ only mentioned data will be imported to zoho CRM. If you want to import all the confirmed data between 2019 to 2021 then just click the ‘Import Data’ button.
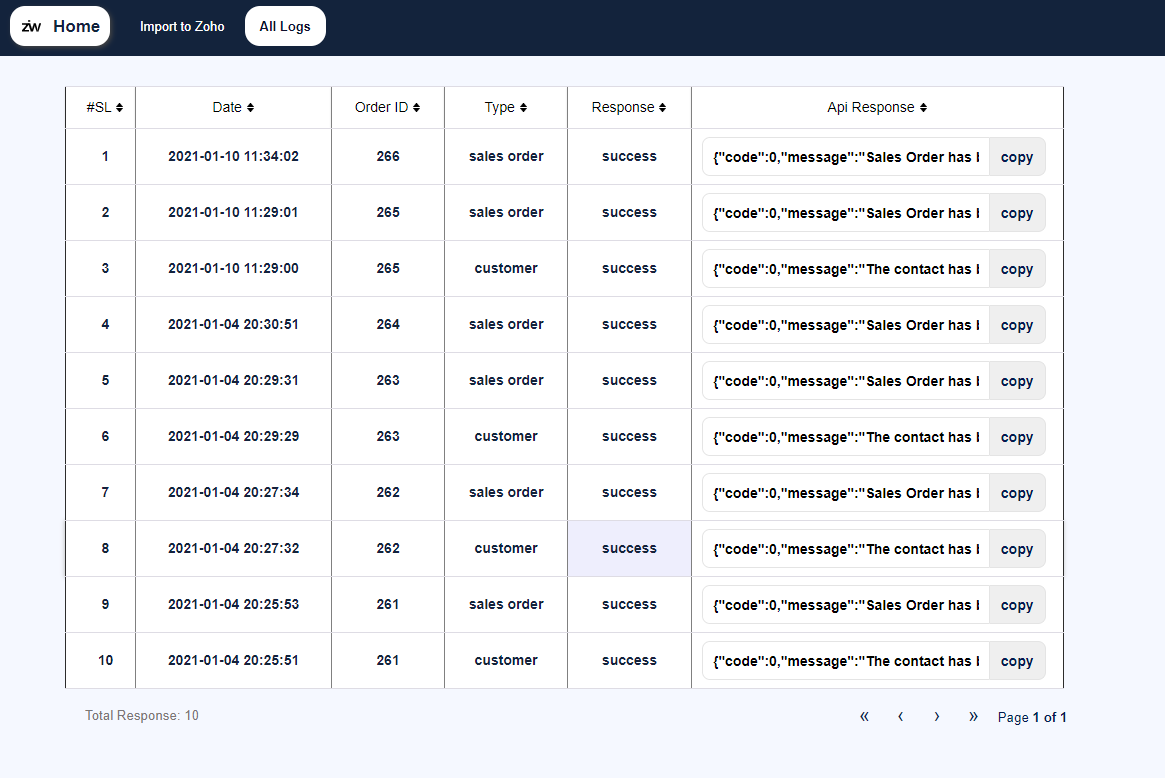
All Logs
All logs allow admin to see the newly created data which has been placed on the site.
If user import any old data from your site, these data will also be displayed here.
Users can sort the columns according to their preference.
Users can copy all the API response of sales order to clipboard.
Log will show the related list of the related module.